How to point domain name to hosting
Your website will not work if your domain is not pointing to the correct Hosting IP address, meaning users will not see any content when they visit your domain.
To point your domain to the hosting, there are two ways to do this:
Point the domain to hosting via Nameserver
Each hosting provider has its own Nameserver, which you can find by searching on Google like this: “Nameserver + Domain provider name”.
For example, the Nameservers of popular hosting providers are:
-
Hostinger’s Nameservers:
-
ns1.dns-parking.com
-
ns2.dns-parking.com
-
-
Mắt Bão’s Nameservers:
-
ns1.matbao.com
-
ns2.matbao.com
-
To do this, go to the domain settings, find the DNS section, and enter the hosting Nameservers.
Each domain provider always has instructions for setting up DNS for the domain, so be sure to contact their support staff for more detailed guidance.
Point the domain to hosting via the Hosting IP Address
In this case, you will use the default Nameservers of your domain provider and need to find the exact IP address of the Hosting to point to.
Step 1: Determine the Hosting IP Address
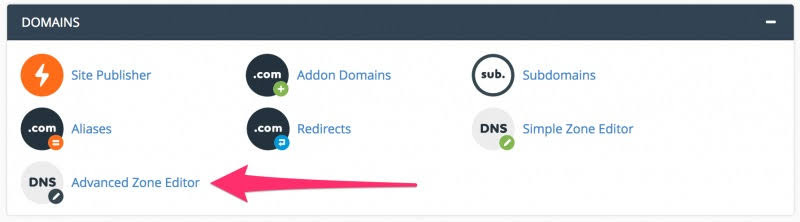
First, you need to identify the IP address of the Hosting package you registered. To get the correct IP, log into cPanel, then go to the DOMAINS section and click on Advanced Zone Editor.
Step 2: Change the Record
In this step, you will manage the domain settings of your domain provider.
There are two necessary records for the domain to function properly:
-
Record @ (or domain.com)
-
Record www (or www.domain.com)
Both of these records must point to the Hosting IP. You can check this by using the “ping” command (On Windows, press Win + R, type “cmd,” and use the syntax ping_domainname to see if the domain points to the correct hosting).
the correct hosting).
Step 3: Confirm the Progress
The update process can take time, and some places may take up to 48 hours. Be patient while waiting!
See more products: Buy advertising accounts
Pointing to an Intermediate Nameserver
Some popular free intermediate Nameservers today are: CloudFlare, Incapsula, Namecheap FreeDNS, etc.
Some advantages include:
-
Saves bandwidth for the server
-
Increases website access speed due to caching on the CDN server
-
Enhances website security, reducing DDoS attacks and spam comments on blogs
-
Free SSL usage (improves SEO ranking)
However, there are also some drawbacks:
-
If the Intermediate Nameserver server is down, your website will experience downtime
-
SSL of the Intermediate Nameserver (CloudFlare) may not work on older operating systems
-
Your website may go offline if the hosting firewall mistakenly identifies the CloudFlare IP range as an attack address
Instructions for Pointing the Domain to a Landing Page
Once you have finished designing the Simple Page, you need to configure the DNS settings of your domain to launch your official website.
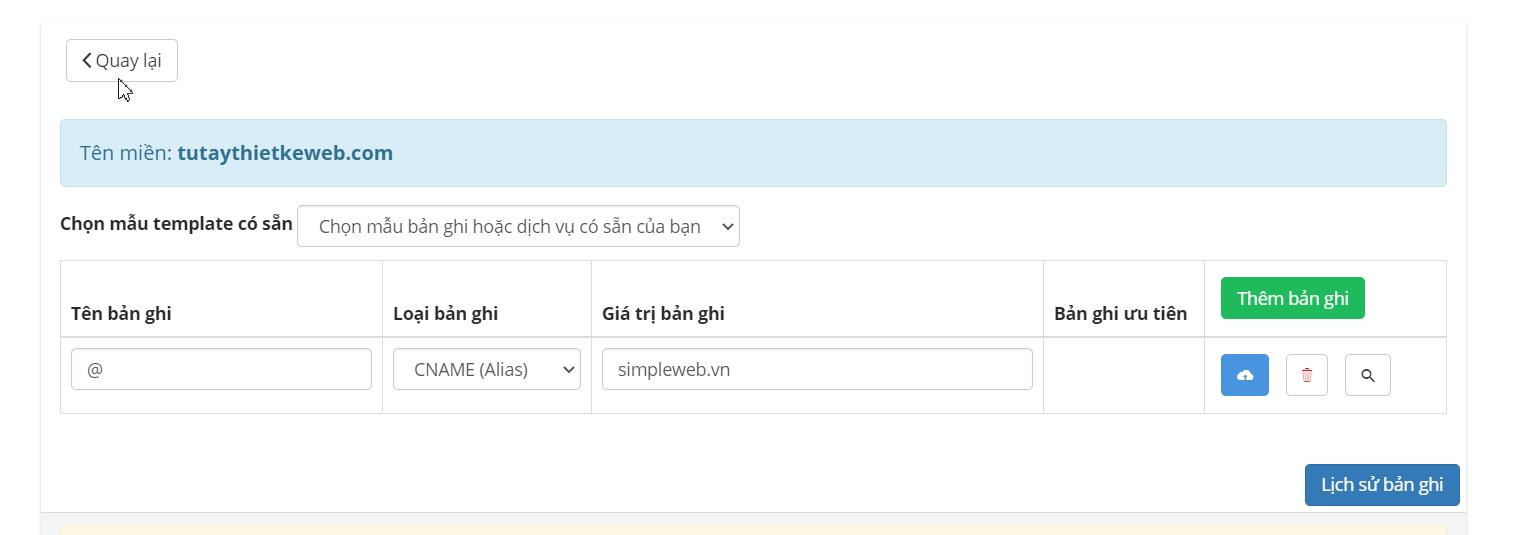
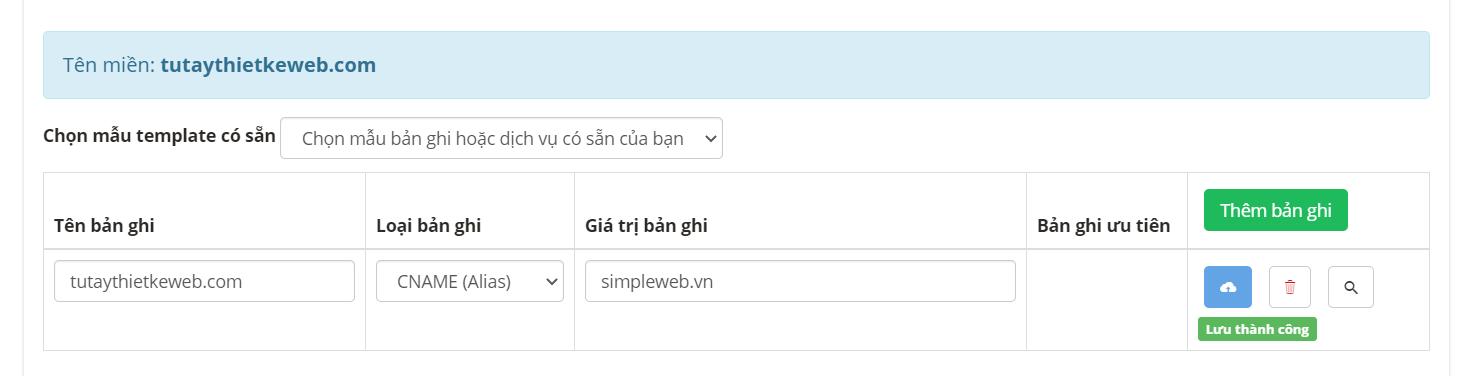
To set the CNAME record pointing to the Simple Page, follow these steps:
First, log into your domain management page -> Select the domain you want to set up the CNAME for -> Update the record for the domain.
Using the Main Domain
If you want to use the main domain, configure it as follows:
-
Step 1: Declare the CNAME record
-
Record Name: @ or your domain name
-
Record Type: CNAME
-
Record Value: simpleweb.vn
-
After filling out the fields, save the record.
-
or:
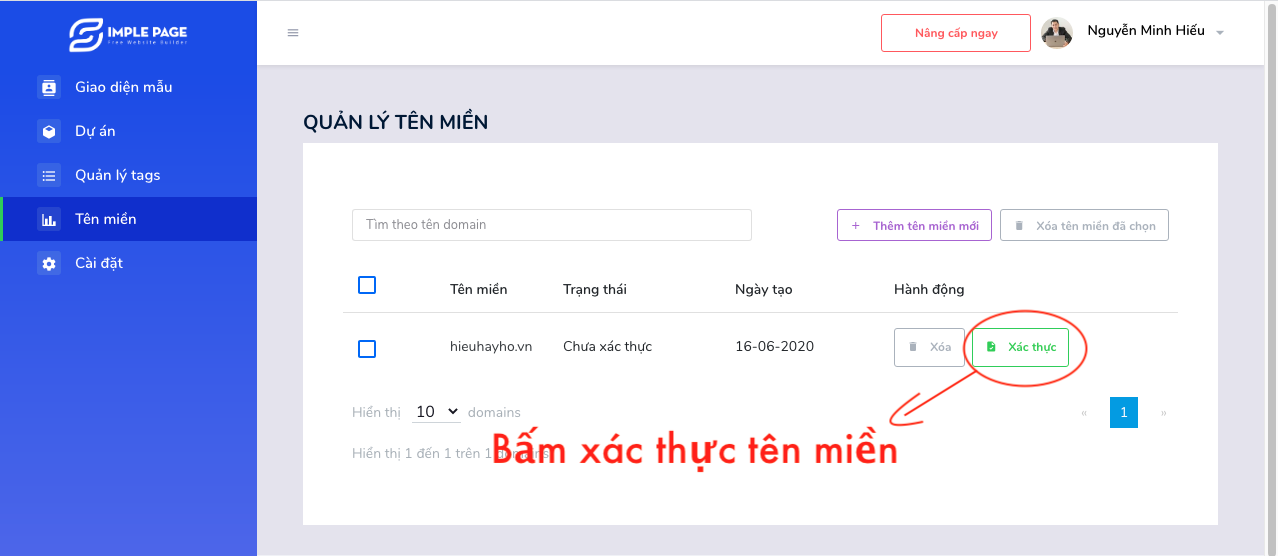
- Step 2: Complete the CNAME record creation for the domain and go back to the Simple Page management page to verify your domain.
- Step 3: Open the browser with your domain and check the result.
Using a Subdomain
If you want to use a subdomain, configure it as follows:
Assuming your main domain is tutaythietkeweb.com, the subdomain would be sanpham.tutaythietkeweb.com. You will create the subdomain and configure it as follows:
-
Step 1: Declare the CNAME record
-
Record Name: sanpham
-
Record Type: CNAME
-
Record Value: simpleweb.vn
-
After filling out the fields, save the record.
-
-
Step 2: Complete the creation of the CNAME record for the subdomain, then go back to the Simple Page management page to verify your domain as shown in the illustration above.
-
Step 3: Open the browser with your subdomain and check the result.
Pointing a Domain via CloudFlare
If your domain provider does not allow you to set up CNAME as mentioned above, we will configure it via CloudFlare.
Steps to Point a Domain via CloudFlare:
Step 1: Access https://www.cloudflare.com/
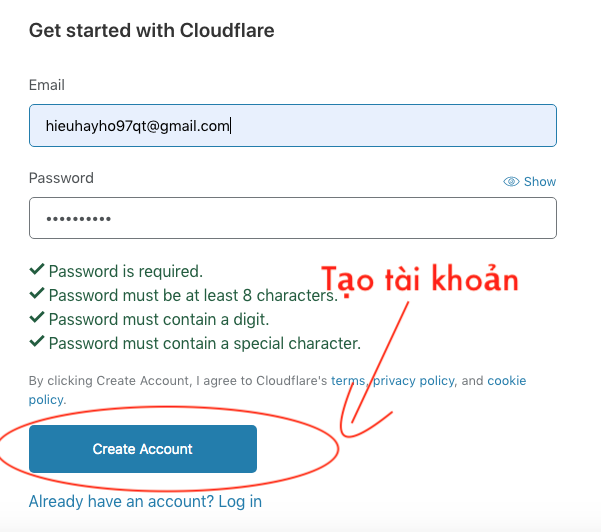
Step 2: Select Sign Up to register for a CloudFlare account (if you already have an account, log in and skip this step).

Step 3: Fill in the required information and click Create Account (if you already have an account, skip this step).
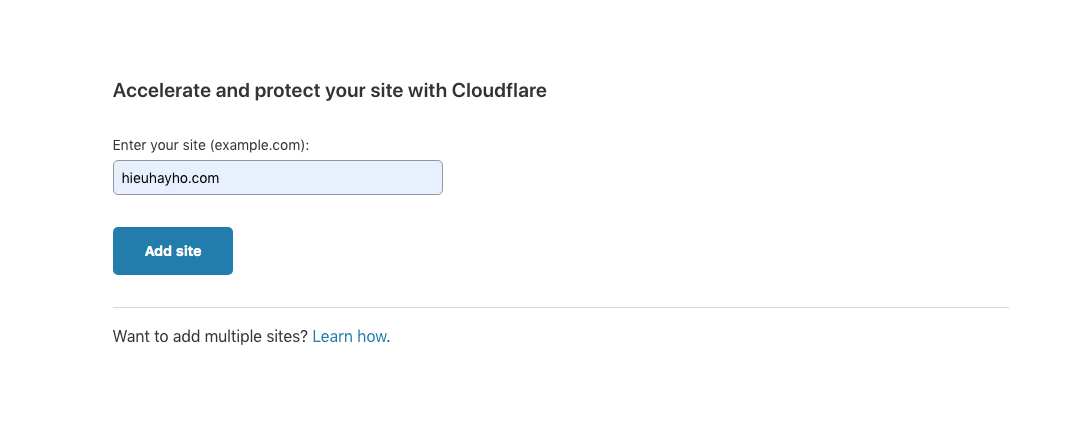
Step 4: Add your domain to CloudFlare and click Add Site.
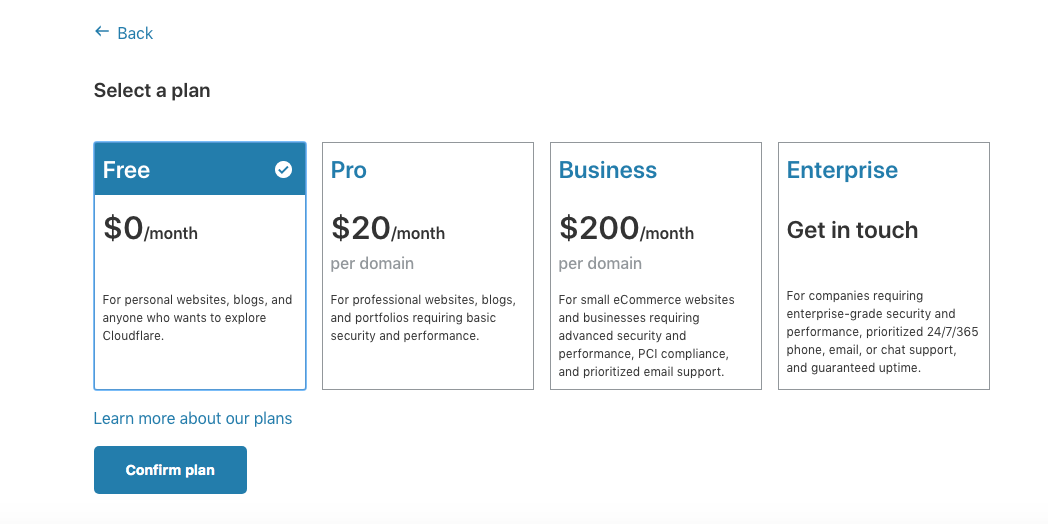
Step 5: Choose the Free plan and click Confirm Plan.
Step 6: Declare the CNAME record
-
Record Name: @ or your domain name
-
Record Type: CNAME
-
Record Value: simpleweb.vn
Then click Add Record.
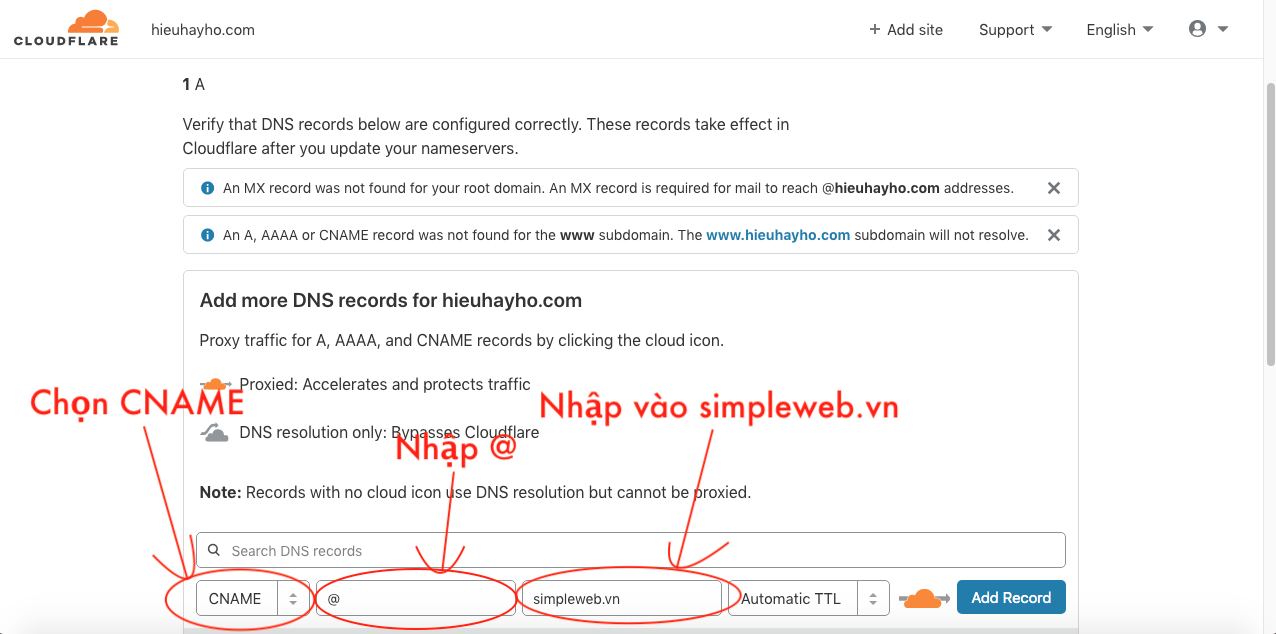
Next, turn off the Proxy status -> Select DNS only.

Step 7: Log in to your domain management page -> Select the domain you want to set up the CNAME for -> Change the Nameservers of the domain to CloudFlare’s.
Delete the default Nameservers from your domain provider and replace them with:
-
Nameserver 1: eloise.ns.cloudflare.com
-
Nameserver 2: ryan.ns.cloudflare.com
Step 8: Complete the CNAME setup for the domain, and wait for the domain provider to verify the new Nameservers. Once verified, return to the Simple Page to authenticate the domain.
Step 9: Open the browser with your domain and check the result.
Using a Subdomain. The process for using a subdomain is the same.
See more products: Buy advertising accounts
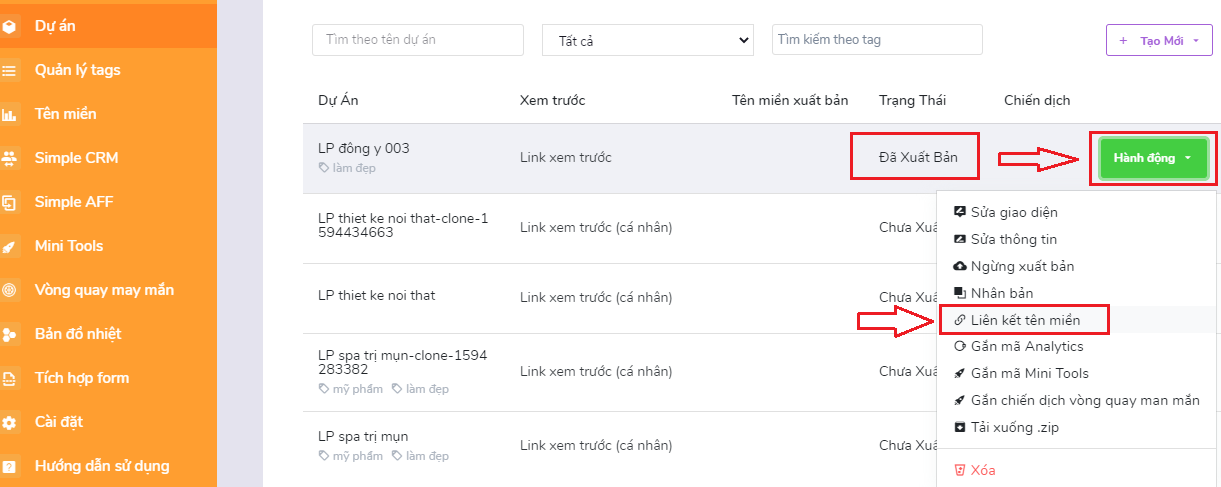
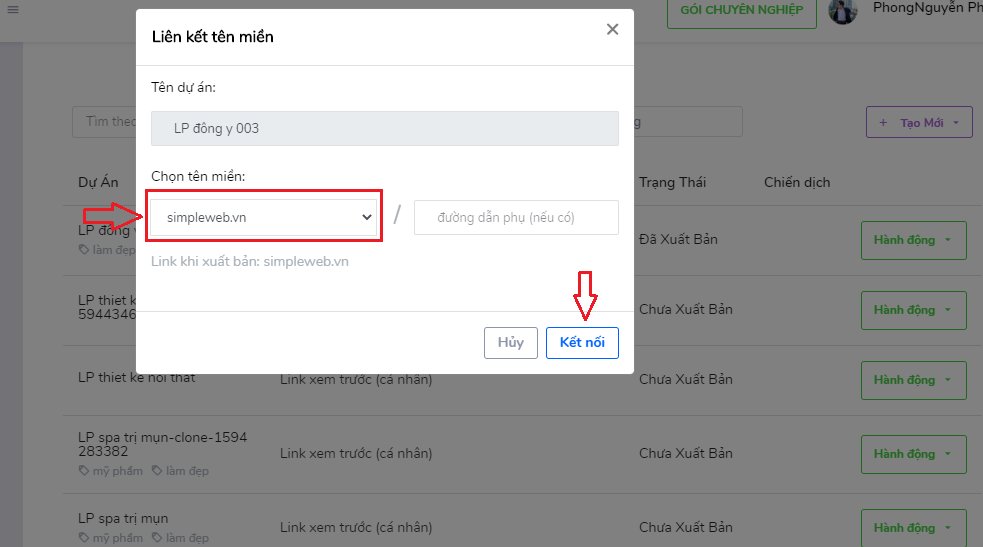
Linking the Domain to a Project
Once the domain has been successfully authenticated, go back to the project section > find the project you want to link the domain to > then click to connect the domain with this project.
Note: The project must be published before linking.
If you need the most reputable payment method and advertising account provider, you can message the fanpage buybm365.com-Ads to receive advice from HT Media. In addition, you can follow the articles. Latest articles related to our Digital Marketing.


