Google Colab and 4 things to know
Google Colab is a customizable version of Jupyter Notebook that allows you to execute Python on the cloud, provided by Google.
1. What is Google Colab?
Using Google Colab offers many outstanding benefits, such as: running Python on any device with an internet connection without needing installation, easy sharing and teamwork, and free GPU usage for AI projects.
In addition, Google Colab provides a great Python programming experience with extremely useful upgrades that are not available in plain Jupyter Notebook or JupyterLab.
Some features include:
-
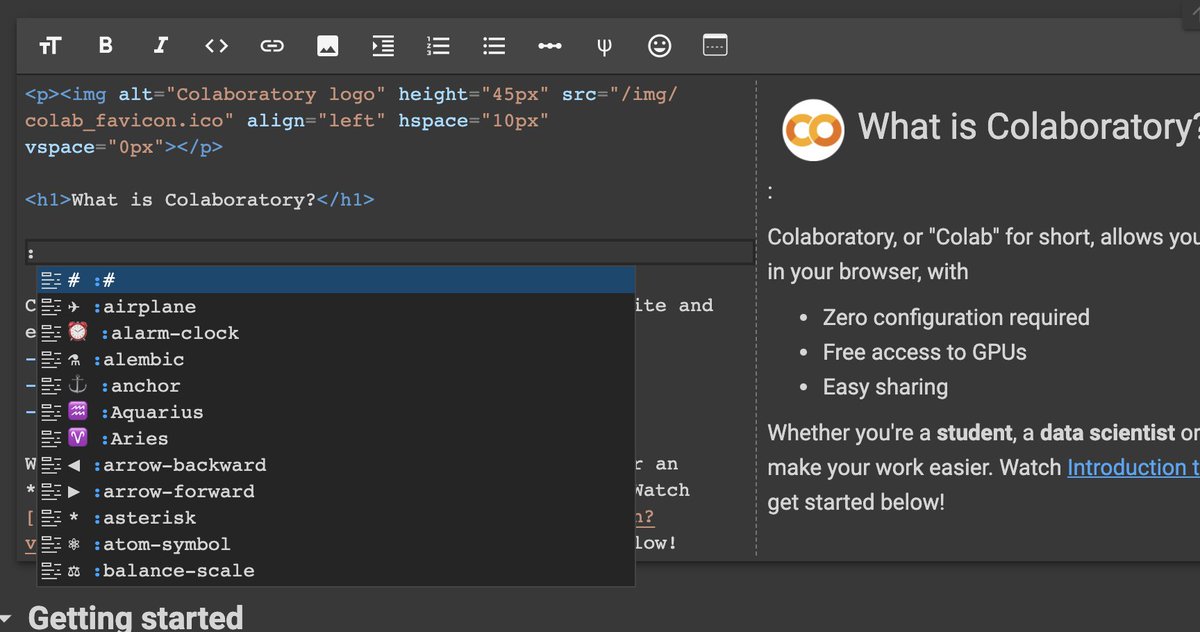
Creating a table of contents based on headings written in markdown language, which helps you easily structure your notebook. You can also collapse or expand sections while editing for convenience.
-
Easily adding images and forms with markdown, which is great for presenting reports or creating dashboards. You can even hide code lines to make the notebook look cleaner using the form feature.
-
Easily connecting to Google Drive, Google Sheets for cloud-based data analysis.
-
Running Python on either the cloud or your local runtime (Python on your personal computer) offers a great experience. You can still take advantage of Google Colab’s great features when running Python on your local runtime, without Google automatically deleting your data at the end of the session as it does on the cloud.
-
Automatically saving edit history as versions, making it easy to revert to the most recent version if needed when errors occur. This feature is similar to Google Sheets or Google Docs and you don’t need GitHub to store these versions.
-
Allows searching and inserting pre-written code snippets (templates) into your notebook. This feature is very useful because you don’t need to open multiple storage files to find code snippets you have already written.
-
Create and share dashboards written in Python with your team easily, similar to Google Data Studio but much more flexible and powerful.
However, Google Colab has one drawback: the session’s temporary data will be erased after being inactive for a certain period, ensuring Colab can provide free resources for many users.
Therefore, every time you open Google Colab, if you need third-party libraries, you will need to install and import them again to use them. Colab Pro can fix this, but it is not yet available in Vietnam.
 See more products: Buy advertising accounts
2. Basic Operations with Google Colab
2.1. Useful Settings
2.1.1. Set Display Language
By default, Google Colab displays in Vietnamese, but if you need to change the language, you can find this option in the Help menu >> View in English.
2.1.2. Enable Dark Mode
If you prefer the dark mode, you can easily enable it by:
-
Searching in the menu bar and selecting Tools >> Settings or click the gear icon in the upper right corner of the notebook next to your avatar to open the Settings section. Choose the dark option in the Theme section and click Save to apply the settings.
2.1.3. Enable Programming Support Options
Open the settings and select Editor, then check all the options in this section. Notably, Show line numbers will display line numbers in a code cell, and Show indentation guides will help display indentation, which is very useful to prevent formatting errors in Python.
2.2. File & Folder Operations
2.2.1. Create, Open, or Upload an Existing Notebook
To open a file with Google Colab, you can use the shortcut Ctrl + O (or Command + O on Mac). You have five main options:
-
Examples: Allows you to open example datasets.
-
Recent: Open recently executed notebooks.
-
Google Drive: Open a Jupyter Notebook from Drive (file format: .ipynb).
-
Github: Connect to Github to clone your projects and open them with Colab.
-
Upload: Allows you to browse and upload notebook files (.ipynb).
2.2.2. Save Your Current Notebook
Google Colab automatically saves your work, but if you want more storage options, you can go to the Menu >> File and choose to save your file to Google Drive or Github depending on your purpose.
2.2.3. Download a Notebook
You can download the notebook as a Jupyter Notebook file (.ipynb) or a Python file (.py) by opening the File >> Download menu and selecting the appropriate file format.
2.2.4. Upload Data
To upload data to the session’s temporary storage in Colab, you can select the Folder section and then click the Upload data icon as shown in the illustration.
If you’re using data from Google Drive, follow the instructions in the next section.
2.2.5. Copy File Path
To copy the file or folder path when you need to open or store a file, right-click on the file or folder in the directory tree and select Copy path.
2.3. Editing a Notebook in Google Colab
Besides regular text copy, Google Colab allows you to copy/paste Code cells and Text cells conveniently. This feature is quite handy, but I don’t see it in Jupyter Notebook, Jupyter Lab, or Visual Studio Code. To copy/paste these cells, use Ctrl and click on the cells you want to copy/paste, then use the familiar shortcuts Ctrl + C and Ctrl + V.
You can activate the Find and Replace feature using the shortcut Ctrl + H or by clicking the magnifying glass icon in the toolbar on the left.
2.4. View – Display Options in Google Colab
Select Menu >> View:
-
Executed Code History: View the history of executed commands in the notebook.
-
Collapse sections: Allows you to collapse nested content under each heading level (e.g., Collapse at the cell containing Heading 1 so that the content under Heading 2 and beyond is collapsed). You can select any cell in the notebook and use the shortcut Ctrl + ] to collapse.
-
Expand sections: The opposite of Collapse sections – allows you to expand content under any heading. Use the shortcut Ctrl + [ for the same result.
2.5. Insert – Add Content to a Notebook in Google Colab
To add a Code cell (to execute commands) or a Text cell (for text), hover over an existing cell and select the corresponding object to add. If it’s a completely new notebook, you can add cells using the two buttons in the top-left corner of the screen as shown in the illustration. You can also use the default shortcut Ctrl + M B to add a Code cell.
To add a Section header, use the corresponding option in the Menu >> Insert or add a Text cell and create a heading with markdown formatting. For example, to create Heading 1 (Introduction), you need to write # I. INTRODUCTION in the Text cell. Add a # before each heading for smaller heading levels.

3. Runtime – Python Execution Environment in Google Colab
3.1. How to Execute Python Commands
To execute commands in Google Colab, click the Play button at the top of each code cell, or select the code cell you want to run and use the shortcut Shift + Enter. You can also use the Runtime menu with various execution options like:
-
Run all: Executes all commands in the Colab.
-
Run before: Executes commands above the code cell you are selecting.
-
Run the focus cell: Executes the code in the selected cell.
-
Run the selection: Executes selected code cells (hold Shift and click to select multiple cells).
-
Run after: Executes code cells after the selected cell.
3.2. Interrupt Execution & Restart the Environment
Sometimes execution doesn’t go as expected, and you may want to stop the execution or restart your Google Colab environment (runtime). The options below in the Runtime menu will be useful:
-
Interrupt execution: Stops the execution of the commands.
-
Restart runtime: Restarts the runtime to apply changes (for example, when you install a new library, and you must restart the runtime to apply the changes), or simply clears errors and restarts the runtime.
-
Restart and run all: Restarts the runtime and runs all commands in the Colab notebook.
-
Factory reset runtime: Clears all current runtime states, including variable declarations and files, then restarts the runtime.
3.3. Change Runtime Type on Google Colab
When using Colab for Machine Learning projects, you may want to take full advantage of Google Colab to execute commands in less time. In this case, hardware acceleration options like GPU or TPU will be extremely helpful.
To change the runtime options, go to the menu: Menu > Runtime > Change runtime type.
3.4. Install New Libraries
Để cài đặt thư viện mới không có sẵn trong Google Colab, bạn thực thi câu lệnh
pip install package_name
where package_name is the name of the library you want to install. For example, to install the facebook_business SDK for Python, run the command pip install facebook_business.
You will often need to reinstall libraries that aren’t available when working in Colab after ending a previous session (typically after 15-30 minutes of inactivity). This can be a bit inconvenient and time-consuming if you use many external libraries.
3.5. Import Libraries
To import a library into Colab, use the following command:
where package_name is the library you want to import, and something is the alias you want to assign to it for easier access. For example, to import the pandas library and give it the short name pd, I would enter this command:
In some cases, the library name may already be short enough, and you can import it simply as:
See more products: Buy advertising accounts
4. Tips for Using Google Colab
4.1. Code Snippet
This is a pretty cool feature in Google Colab that lets you search and insert pre-written code snippets into your notebook. It can save you a lot of time.
To insert a code snippet, use the keyboard shortcut Ctrl + Alt + P (Control + Option + P on Mac) or click the Code Snippet icon on the toolbar at the left side of the screen, or go to Menu > Insert > Code snippets.
To add your own notebook containing code snippets, simply copy the notebook URL from the browser and paste it in the Custom snippet notebook URL section in Colab settings.
To make snippets easier to find, you need to structure your headings with heading 1 before each code block. You can add a # before the section name (the # denotes heading levels).
4.2. Scratch Code Cell
A scratch code cell lets you run code in a draft format without affecting your notebook’s results or layout.
You can activate this feature with the keyboard shortcut Ctrl + Alt + N (Control + Option + N on Mac) or from Menu > Insert > Scratch code cell. Another way is to open the Command Palette with Ctrl + Shift + P, then search for scratch code cell and press Enter.
4.3. Command Palette
The Command Palette is a convenient feature that allows you to quickly search for actions in Colab, similar to Visual Studio Code. To open it quickly, use the keyboard shortcut Ctrl + Shift + P (works on both Windows and Mac).
4.4. Shortcuts
Google Colab provides a variety of keyboard shortcuts to activate useful features. To open the shortcut list and configure the shortcuts, press Ctrl + M + H (Command + M + H for Mac).
4.5. Table of Contents (TOC)
TOC is a great feature in Google Colab that allows you to navigate between different sections of your notebook quickly. You can also collapse or expand sections under each heading to keep your workspace organized. This feature makes it feel like you are writing a document or a book. I have used this feature to organize my entire Python course and share it with my students in a convenient way.
4.6. Run Google Colab with Local Runtime
Google Colab allows you to choose either the Cloud Runtime provided by Google, which enables you to use Google’s GPU and TPU, or a Local Runtime you set up on your personal machine. Using Local Runtime prevents the need to reinstall necessary libraries each time you use Colab.
If for any reason, the official Colab documentation for setting up Local Runtime doesn’t work, I’ve made a few adjustments to the Terminal commands provided by Google. This guide may help clear up any confusion.
Note: If you are using a Windows computer, follow the steps below in the Python Anaconda environment, using Anaconda Prompt instead of the default Command Prompt.
Step 1: Install Jupyter on your computer
Choose one of the two methods below, open the terminal/command prompt, and run the corresponding command. If you have already installed Anaconda, you can skip this step. This step only needs to be done once.
Install with Anaconda:conda install -c conda-forge jupyterlab
Install with pip:pip install jupyterlab
Step 2: Install and activate the jupyter_http_over_ws extension
Enter the following code and execute it on the terminal/command prompt (only install once). If you are using the Anaconda runtime, you need to open the command prompt (on Windows) to run this command. For Mac, you can run the command below with the default terminal.
pip install jupyter_http_over_wsjupyter serverextension enable --py jupyter_http_over_ws
Step 3: Start the server and authenticate
Each time you want to run Colab in the local environment, you need to perform this step. Enter the following code in the terminal/command prompt (or Anaconda prompt on Windows).
Once the server is started, the terminal will display a URL like https://... which you need to copy and use. Press the connect button in the top right corner of the Colab notebook and paste the URL you just copied to connect.
jupyter notebook --NotebookApp.allow_origin='https://colab.research.google.com' --port=8888 --NotebookApp.port_retries=0
If you want to open a specific folder when running Google Colab with local runtime, you can customize the command in step 3 to run it in Terminal/Command Prompt. Below, I want Google Colab to work at the folder D:\OneDrive\Github:
jupyter notebook --NotebookApp.allow_origin='https://colab.research.google.com' --port=8888 --NotebookApp.port_retries=0 --notebook-dir="D:\OneDrive\Github"
4.7. Quick Tip for Switching Between Python Environments
I often write notebooks and program in Python for use across multiple different computing environments like Google Colab, MacBook, Windows, Raspberry Pi, Linux Server, so configuring the directory paths for ease of use is crucial.
One small tip I often use is assigning the working directory to the project_folder variable and the delimiter for Windows/Mac/Linux to the lmt variable (you might already know that Windows uses backslashes \ to separate directories while Mac/Linux uses forward slashes /).
Google Colab runs on a Linux environment. So, whenever I need to refer to a folder or file in the working directory, I use the join function to concatenate the components of the name. For example, to read a file sample.csv, I use this command:df = pd.read_csv(lmt.join([project_folder, 'sample.csv']))
4.8. Mount & Unmount Google Colab with Google Drive
To interact with files and folders in your Google Drive from Google Colab, you need to mount your drive.
This is very simple. Click the Folder icon and select the Google Drive icon. Then, a piece of code will be automatically inserted into Colab, which you need to execute. A new tab will open to ask you to authenticate your account. Once authenticated, copy the token key, return to Colab, and paste it into the code input field and hit Enter.
Since I’ve connected Drive many times recently, in the demo video below, when mounting the drive, Google doesn’t ask me to authenticate again.
Connect and Disconnect Google Drive with Colab Notebook | Mount & Unmount Google Drive
For those who use multiple Google accounts in the same browser like me, sometimes authenticating the wrong account for connection might cause confusion, making it hard to change the account and access the required directories.
Here’s the code you need to execute:
You can insert this code into a sample Colab file for quick access from the Code Snippet interface in the Colab notebook, as demonstrated in the video.
4.9. Connect Google Colab with Google Sheets
Google Colab already has a code snippet to import/export data to/from Google Sheets simply, but it’s inconvenient because every time you execute a command to read/write data to Google Sheets in a new session, you have to manually authenticate access.
See more products: Buy advertising accounts
4.10. Restore Colab Notebook to a Previous Version
In many cases, due to a mistake, you might delete one or more code blocks, or even an entire section. You will definitely need an undo operation to revert this. Sometimes you may also want to restore an older version of a notebook and ignore recent changes.
The Revision History feature will save you. To access this feature, go to:
Menu > File > Revision History
So even without using Github, you can still control the different versions of your notebook with Colab.
Restore an older version of the notebook with the Revision History feature in Google Colab
4.11. Create Dashboards with Google Colab Completely Online
If you plan to use Google Colab as a “cloud-based” Python dashboard, it is entirely feasible. To implement this idea, you may need to use scripts to sync files with Google Drive through the Python library PyDrive (scheduling automatic data refresh using crontab on Raspberry Pi) or simply save files locally and sync with Google’s Backup & Sync tool on Windows and Mac computers.
4.12. Connect Google Colab with Github
To read repositories on Github or save your notebook to Github, it’s very simple.
-
Open a file from Github: Use Menu > File > Open Notebook, and select Github as the storage source. Then authenticate your account if you want to open files from a private repo.
-
Save a file to Github: Use Menu > File > Save a copy in Github, then authenticate your account and select the repo and branch where you want to store the file.
4.13. Compare Differences Between Two Notebooks
Google Colab provides a convenient feature for comparing two notebooks with each other. You can activate this feature from:
Menu > Tool > Diff Notebooks
I hope this article helps those who are new to Python and even those who have been using Google Colab at a basic level with many useful suggestions.
If you need the most reputable payment method and advertising account provider, you can message the fanpage buybm365.com-Ads to receive advice from HT Media. In addition, you can follow the articles. Latest articles related to our Digital Marketing.


