Details on how to run Google Shopping ads for beginners
This article shares how to run Google Shopping ads at a basic level for those who are just starting to learn about Google Shopping Ads. Follow the step-by-step guide on how to set up Google Shopping below.
1. What is Google Shopping?
Before diving into the detailed guide on how to run Google Shopping ads, let’s take a quick look at the history of Google Shopping – the shopping feature on Google.
In 2002, a computer scientist from New Zealand named Craig Nevill-Manning (who was also the first technical director at Google) created Google Shopping. Initially, the product was named Froogle. On April 18, 2007, it was renamed Google Product Search. Starting from May 31, 2012, the product was renamed Google Products.

Craig Nevill-Manning, the father of Google Shopping ads
In June 2017, Google Shopping was fined 2.4 billion euros by the EU for prioritizing its own online shopping services in search results.
Similar to Google AdWords, Google Shopping ads are an online advertising format provided by Google that displays related products based on user queries. Customers can view product images, compare prices across services directly on Google’s search page.
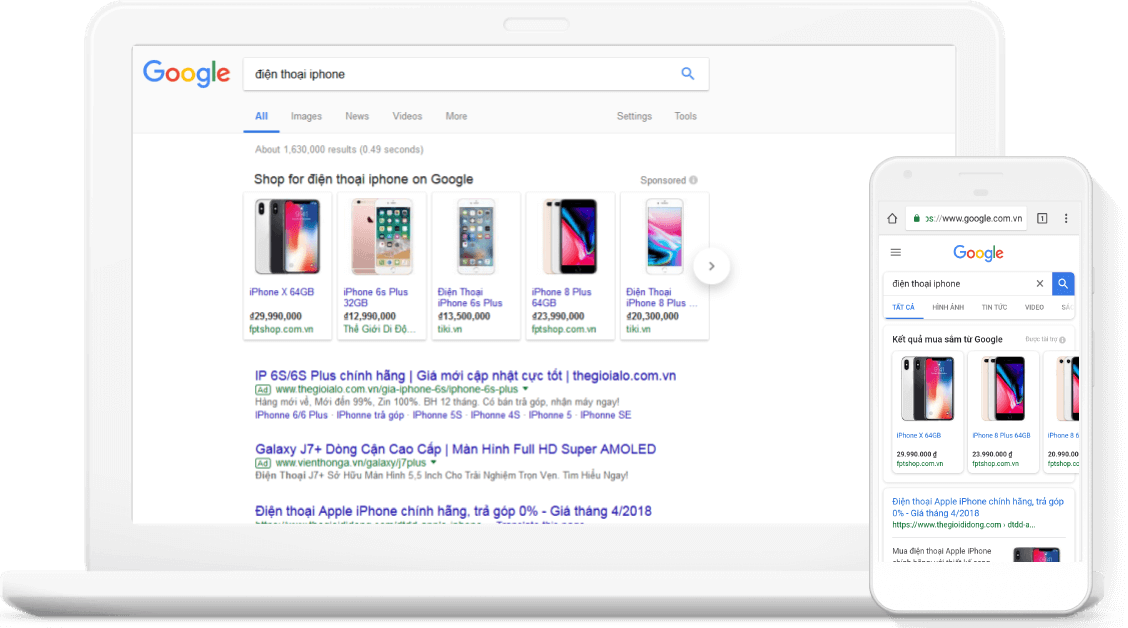
Product interface displayed on Google Shopping Ads
For store owners, this is an effective way to list products on Google, as their products can instantly reach potential buyers with a high conversion rate.
However, to have products displayed on Google Shopping, you need to run ads – this is a necessary condition.
The sufficient condition is that your PPC (Pay-Per-Click) bid must be higher than competitors, and you need to have a better quality score. Of course, in many cases, even with a lower bid, if your ad quality score is higher, your product will still be prioritized for better ranking on Google Shopping.
If you want to learn more about Google Shopping and the advantages of using this ad format, read our article: “Top 10 Advantages of Running Google Shopping Ads.”
In today’s article, we will focus on guiding you step by step on how to set up a Google Shopping campaign.
See more products: Buy advertising accounts
2. How to Run Google Shopping Ads (Updated )
The steps to set up a Google Shopping campaign are quite simple. Here are the steps to follow:
-
Create a Google Merchant Center account
-
Verify Google Merchant Center with the website owner
-
Create and upload product feed
-
Link Merchant Center and AdWords account
-
Create a new Google Shopping Ads campaign
-
Configure the ad account settings
Let’s go through each step in detail.
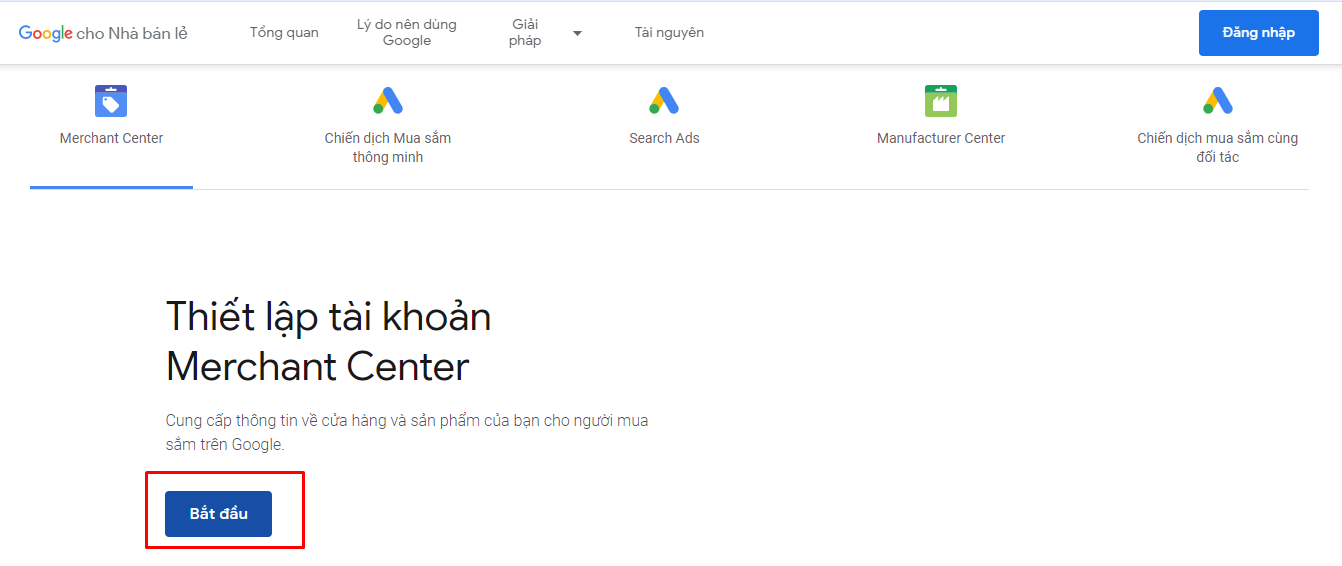
Step 1: Create a Merchant Center Account
Google Merchant Center is the data feed where you upload your store and product data that needs to be promoted on Google.
You must have an active Google AdWords account (create a new one here) and a Google Merchant Center account before running ads on Google Shopping.
Steps to register a Google Merchant Center account:
Go to the Google Merchant Center website > Select “Get Started” > Log in with your email.
After logging in, you’ll be redirected to the Google Merchant Center dashboard. At this point, update some basic information like:
-
Business name
-
Business country
-
Time zone
-
Where do you want your customers to pay? (You can select different payment methods by checking the provided options)
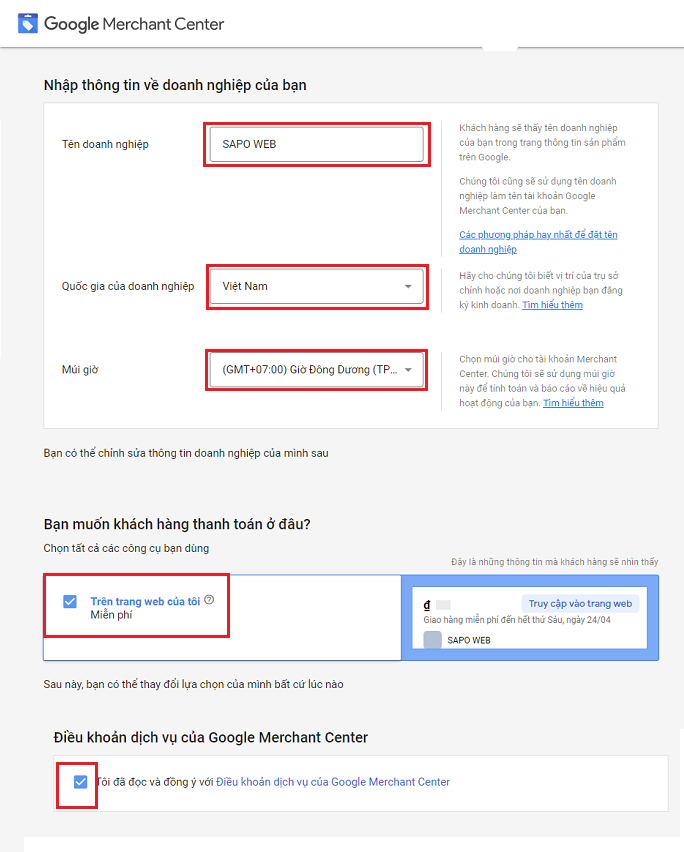
After filling in the information, click “Create account” to complete the registration process.
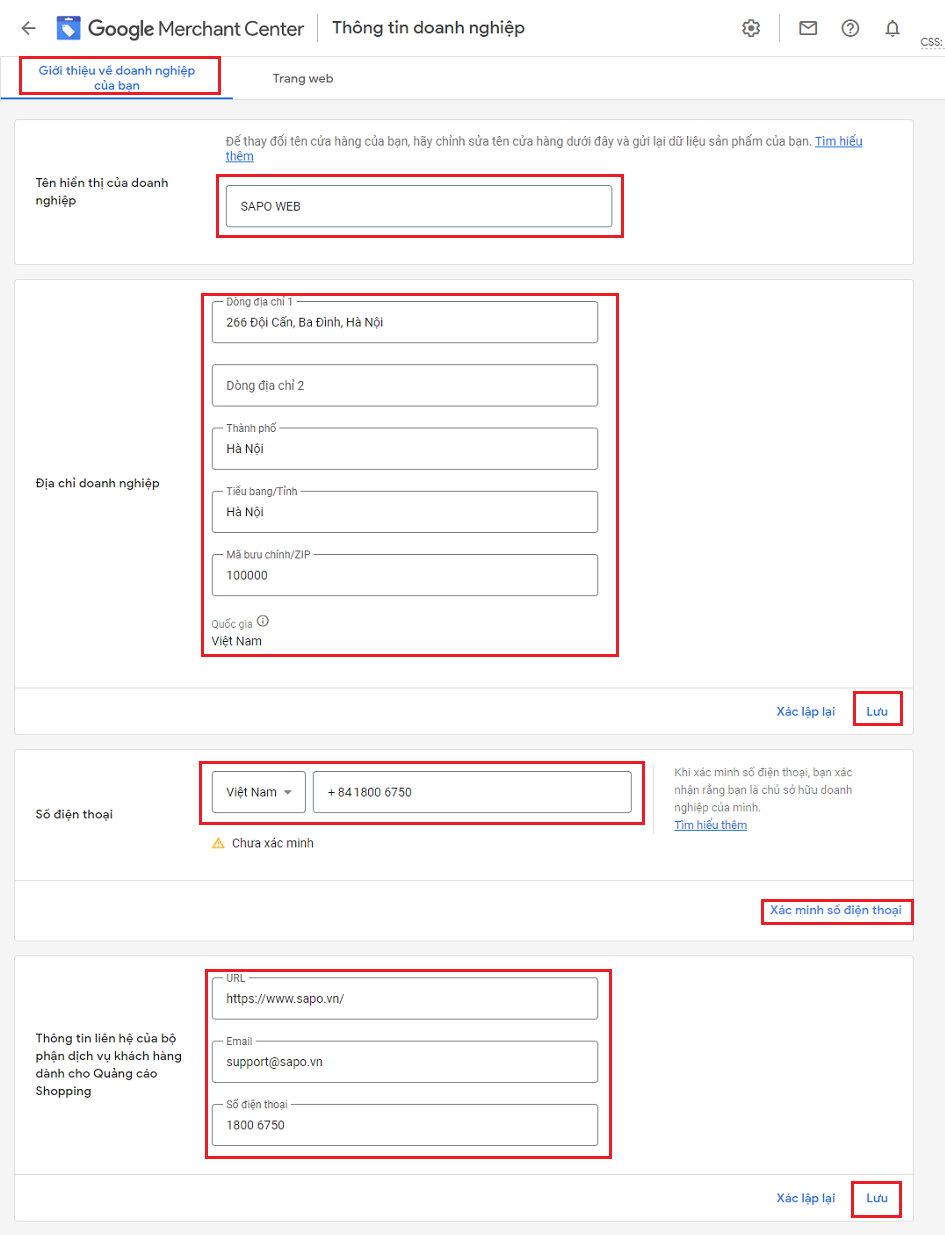
Next, you will be redirected to the “Business Information” page in Merchant Center, where you will continue updating the correct information about your business/store, then click “Save.”
Step 2: Verify Google Merchant Center with the Website Owner
On the “Business Information” page, under the “Website” tab, Google will suggest four ways to verify your Google Merchant Center account with the website owner.
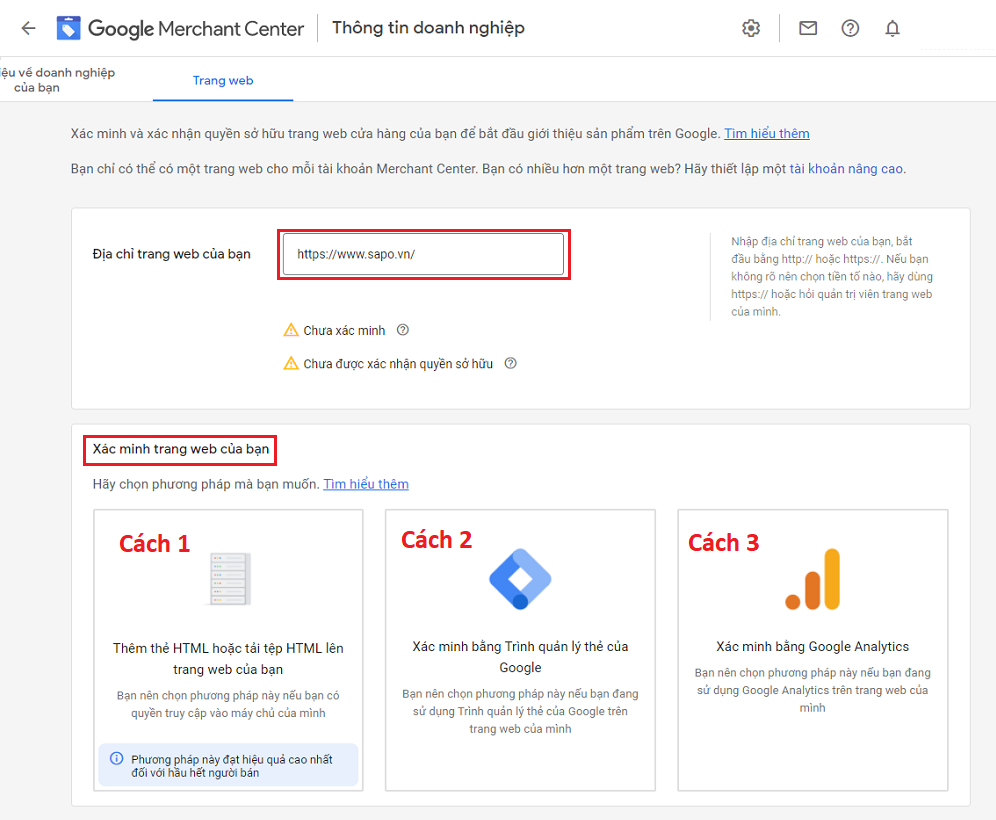
Usually, I choose Method 1: Add an HTML tag or upload an HTML file to your website. (This is also the method Google most recommends.)
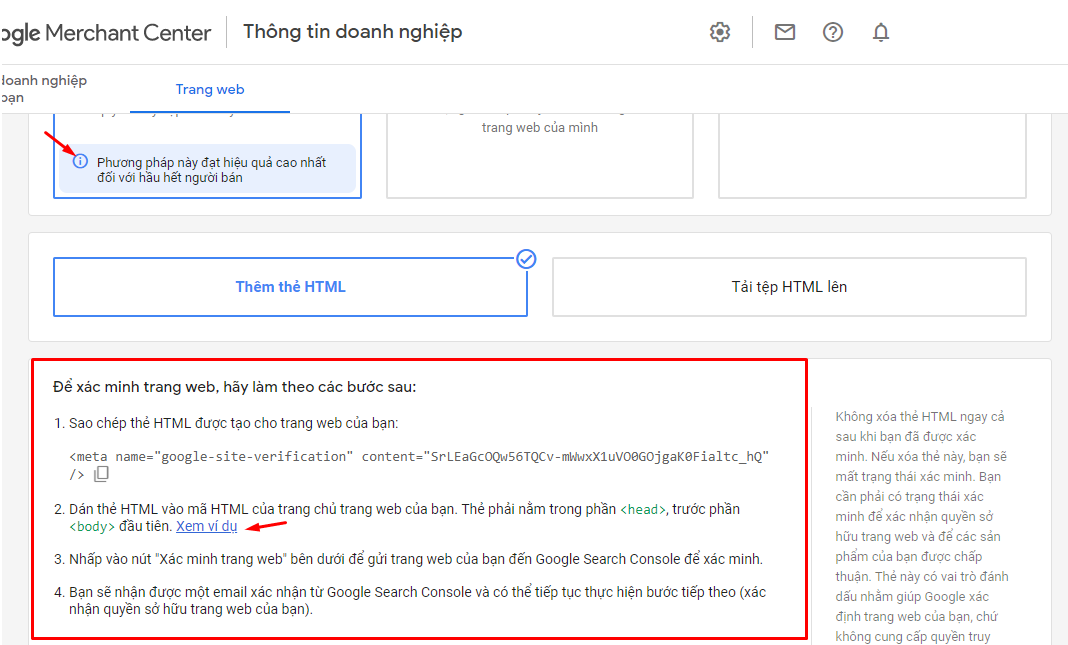
Click the “i” icon to view Google’s detailed instructions and follow them easily.
Step 3: Create a Product Feed and Upload Data
As mentioned earlier, Google Shopping Ads allows product information (product name, image, price, etc.) to be displayed directly in the search results for users. But how does Google obtain this information for display?
This is made possible by Google Merchant Center. This tool uploads all store and product data to Google and provides the information needed for Google Shopping ads.
Your task in this step is to push product data from your website to Google Merchant Center so Google Shopping can retrieve and display it.
This process is called creating a Product Feed for Google Merchant.
How to do it:
Go to Products > Upload multiple products > View all methods.
Then, select the country and language (Vietnamese), and click Continue.
Name your feed and select a method to connect your website data to Merchant Center. There are five available methods:
-
Upload via Google Sheets
-
Scheduled Fetch
-
Manual File Upload
-
Website Crawling
-
Content API
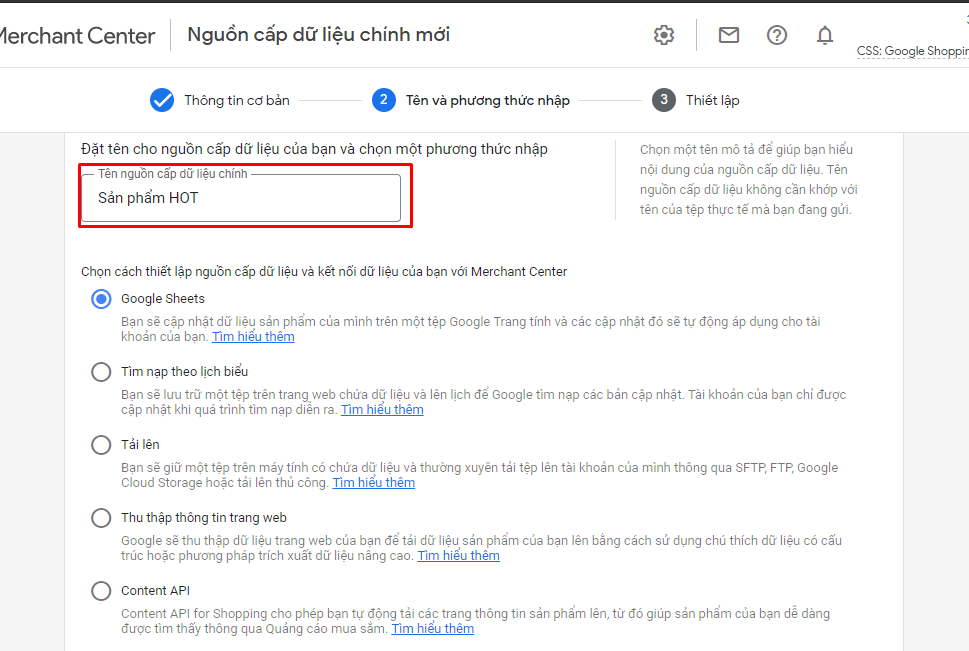
I usually use Scheduled Fetch, combined with the support of the Google Products Feed app (only for websites using the Sapo Web platform) to quickly and easily upload my existing product data to Google Merchant Center.
You can find a detailed guide in the article: How to upload product feed to Merchant Center when running Google Shopping Ads.
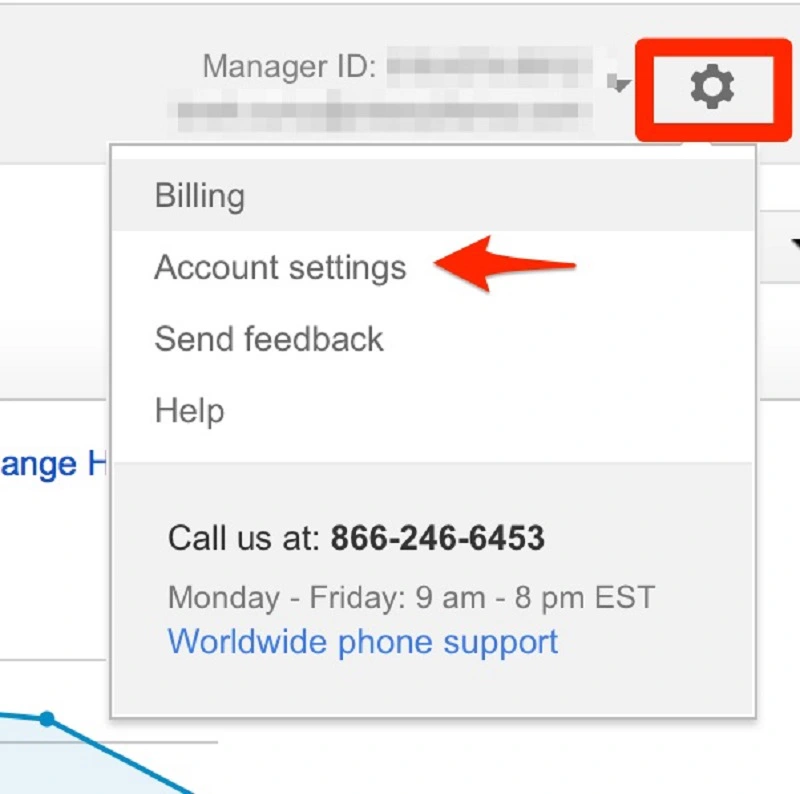
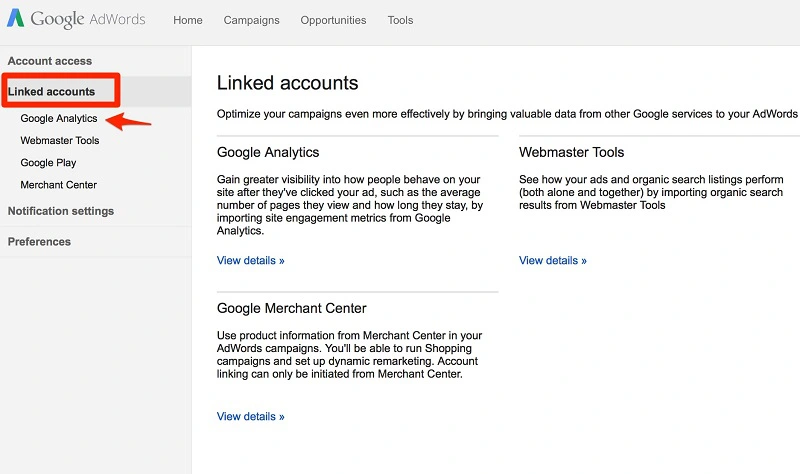
Step 4: Link Merchant Center with Your Google Ads Account
Follow these steps:
-
In Google Merchant Center > Click the gear icon in the top right > Go to “Linked Accounts” > Then click “Link Account.”
-
Log in to your Google Ads account to retrieve your Ads account ID.
-
Return to Merchant Center > go to “Link Account” > Paste your Google Ads customer ID into the field > Click “Send link request.”
-
After sending the link request, go back to your Google Ads account to accept it:
Navigate to Linked Accounts > Google Merchant Center > Details > Approve.
Step 5: Create a New Google Shopping Campaign in Google Ads
This guide focuses on setting up Google Shopping Ads, so I won’t dive deep into AdWords account setup. You can refer to detailed guides for setting up a Google Ads account.
Below are some basic setup tips for creating and launching a Google Shopping campaign.
Create a new campaign:
-
Go to the “Campaigns” tab, then click the blue (+) Campaign button.
-
Choose your campaign goal (e.g., “Sales”) > Select the campaign type “Shopping.”
-
Choose your Merchant Center account. Once your Ads and Merchant Center accounts are linked, your product feed will be automatically selected.
-
Then, choose your campaign subtype: Standard Shopping Campaign or Smart Shopping Campaign, depending on your goals.
In this guide, we’ll choose Standard Shopping Campaign.
Step 6: Configure Your Campaign Settings
Next, configure your campaign with the following:
-
Campaign name for easy tracking.
-
Bidding strategy: Choose from Manual CPC, Maximize Clicks, or Enhanced CPC depending on your needs.
-
Budget: Enter the amount you’re willing to spend per day. Google will use this budget along with your feed quality to determine your ad visibility.
-
Priority Level.
-
Target Locations: You can choose nationwide (Vietnam) or specific cities/provinces to optimize costs.
Name your campaign clearly. Many advertisers overlook this simple step or use random names, making campaign tracking more difficult. I usually name campaigns based on season or experimental goals.
Set campaign priority (Low, Medium, High) based on your bid:
-
For testing, set it to Low Priority.
-
If the same product appears in multiple campaigns with the same priority, the highest bid wins.
-
If campaigns have different priorities, Google will favor the higher-priority campaign regardless of bid.
For those running their own campaigns, I recommend checking forums or in-depth articles about campaign priority to optimize your ad setup and ROI.
Default Bids, Budget & Delivery
We’ll share more about advanced bidding in future posts, but you’ll need to set a default bid based on your product’s price and market competitiveness.
Don’t worry too much — this is just the default bid, used when no custom bids are specified later.
Usually, you’ll want to start your Google Shopping campaign with a moderate bid — not too high, not too low — and monitor performance. To sell faster, I suggest using Accelerated delivery instead of the default “Standard.” Fast delivery helps your product appear quicker and more often for relevant searches.
Networks & Placements
By default, your ads will show on Google Search, AOL, Google Maps, and YouTube.
I usually keep ads running on AOL, Maps, and YouTube because CPCs are lower than Google Search, while still maintaining a high conversion rate. Depending on your industry, choose display networks accordingly. For global products, broad placements are ideal — and vice versa.
Finally, set up your ad group name and click Save to complete your Google Shopping Ads campaign setup. You’ll need to wait 3–5 days for Google to review your ads. If something is missing or doesn’t meet the guidelines, Google will notify you for revisions.
See more products: Buy advertising accounts
3. Link Google Analytics and Set Up Conversion Tracking
3.1 Linking Google Analytics to Google Ads
There are two ways to do this:
You can either create an AdWords tracking code and place it on your order confirmation page, or import conversions from Google Analytics.
Either way, you’ll need to link your Google Analytics account with your Google Ads account to collect data. Click the settings icon at the top right, using the email address and account ID associated with both platforms.
Note on linking Analytics accounts
You must use the same email address that has admin access to Google Ads, Google Analytics, and Google Merchant Center.
Integrate your advertising accounts
To create a conversion tracker in Google Ads, go to Tools > Conversions.

Select the website you want to track and view your conversion results there.
3.2 Conversion Tracking in Google Analytics
Here are a few reasons why you should connect Google Analytics with your Google Ads account:
More options for conversion tracking
In Analytics, you can break down your conversion data in multiple ways. Often, a customer visits your site several times before making a purchase. Analytics allows you to see where your ad click appears along the customer journey.
-
A user might click on your ad first, then return via another channel to buy (first-click conversion).
-
Or, they might click your ad right before purchasing (last-click conversion).
By default, Google Analytics attributes last-click conversions, giving all credit to the final interaction. However, you can also view first-click and assisted conversions.
In short, Analytics helps you understand how potential customers “wander” through your site and engage with your ads. Considering all these touchpoints allows you to evaluate the quality of your ads and improve them for higher conversion rates.
Additional data on customer behavior
While conversion rate is the most important metric to measure ad success, it’s not the only one.
Look at engagement metrics like:
-
Time on site
-
Average pages per session
-
Bounce rate
These metrics offer insights into user experience. When combined with conversion data, they give you a comprehensive view of your website and campaign performance.
Remarketing lists
Integrating Google Analytics gives you greater flexibility in creating remarketing lists based on how users interact with your website.
You can create lists based on:
-
Specific pages users visited (e.g., collection or product pages)
-
Goals completed (like submitting a form or watching a video)
-
Time spent on your site
Such audience-based segmentation offers you more precise targeting and smarter ad strategies.
See more products: Buy advertising accounts
4. Some Notes When Creating Google Shopping Ads
When starting out, don’t upload your entire inventory to Google Merchant Center. Instead, pick around 30 to 50 best-selling products with good images and competitive pricing for your initial Google Shopping Ads campaigns.
Once you’re comfortable with managing product feeds and understanding your conversion rate on Google Shopping, you can begin to scale up.
Setting up Google Shopping Ads is not difficult. The only slightly complex part is uploading product data from your website to the Merchant Center. To get your ads approved, make sure you carefully read through Google Shopping’s advertising policies.
Shopping ads attract interested buyers through eye-catching images and competitive prices. Once the user clicks and lands on your page, Google Shopping’s job is done — from there, it depends on your landing page content, user experience, and sales strategy whether you convert that visitor into a buyer.
Therefore, it’s crucial to invest in content quality and a smooth user experience, both on desktop and mobile.
If you need the most reputable payment method and advertising account provider, you can message the fanpage buybm365.com-Ads to receive advice from HT Media. In addition, you can follow the articles. Latest articles related to our Digital Marketing.


